YTSEOHub Guides · Updated July 2026
The Complete YouTube SEO Workflow: From Search to Upload
Stop treating metadata as an afterthought—run this end-to-end process before every upload so search, browse, and suggested all pull in the same direction.
By HAPPYMYNDS · ~12 min read · Practical YouTube SEO
Most creators treat YouTube SEO like a checkbox: film the video, slap on a title, paste a description, add twenty tags, publish. That approach works when you already have an audience. It fails when YouTube is your primary discovery engine. Search and suggested traffic depend on alignment—your keyword, your title, your thumbnail promise, your opening hook, and your watch time all need to tell the same story.
This guide is a workflow you can run on every video, whether you upload once a week or daily. It moves in order: research before you script, packaging before you upload, and a final checklist before you hit publish. Nothing here requires paid tools. Everything maps to free YTSEOHub helpers you can bookmark and reuse.
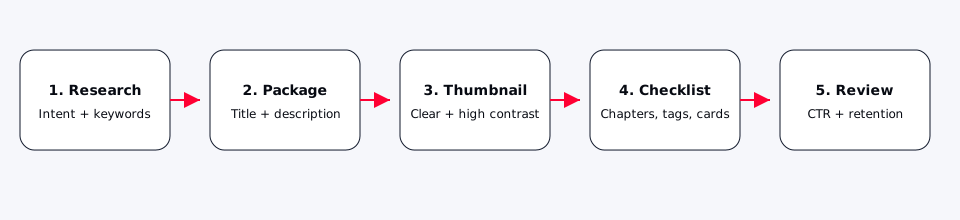
Why a workflow beats random optimization
YouTube does not rank a single field in isolation. A strong title with a misleading thumbnail kills click-through rate. A click-worthy package with a weak opening kills average view duration. Tags that do not match spoken keywords confuse relevance signals. When each step happens in isolation, you fix one leak and create another.
A workflow creates a single source of truth: your primary keyword and search intent. Every downstream decision—outline, hook, title, description, tags, chapters—references that keyword. You are not guessing at upload time. You are executing a plan you made when you still had perspective.
Phase 1: Keyword and intent research (before you script)
Start with a seed topic, not a finished title. Example: you want to make a video about fixing blurry exports in DaVinci Resolve. Your seed might be "DaVinci Resolve export blurry." Before writing a word of script, answer three questions:
- What is the viewer trying to do? Fix a problem (transactional/how-to intent).
- What already ranks? Open YouTube in an incognito window and search the phrase. Note title patterns: "How to fix…", "Why your exports look blurry", "Settings you missed."
- Can you match or beat the top results? If every ranking video is twenty minutes and you planned a three-minute Short, intent may not fit long-form search.
Write down one primary keyword and two supporting phrases. For the Resolve example: primary davinci resolve export blurry, supporting export settings 4k and bitrate too low. These go at the top of your project doc. Every later step checks against them.
Use the YouTube Tag Generator early—not for the final tag list, but to surface related terms you might otherwise miss. If "render cache" and "delivery page" appear repeatedly, your script should mention those settings by name. YouTube matches spoken language to queries more reliably when your metadata uses the same vocabulary.
Phase 2: Outline and hook aligned with the query
Search-intent videos need the answer fast. For a how-to query, state the fix in the first thirty seconds, then explain why it works. For a "best settings" query, show the recommended settings before the deep dive. For a versus query ("Premiere vs Resolve export quality"), name both tools in the opening line.
Build your outline as timestamps before you record. Each chapter title should contain a natural keyword variant where it fits—not stuffed, just clear. Example chapter list:
- 0:00 Why exports look soft (wrong resolution scale)
- 1:20 Delivery page settings that matter
- 3:45 Bitrate: when higher actually helps
- 5:10 Export checklist before you upload to YouTube
Those timestamps become your description chapters later. Planning them now saves re-editing and gives you retention-friendly structure.
Phase 3: Title and thumbnail as one unit
Never finalize a title without seeing it next to your thumbnail mockup. The title handles keywords and clarity; the thumbnail handles emotion and contrast. Together they must answer: "Is this the video I meant to click?"
Draft three title options with the Title Generator, then narrow to one primary and one backup. Good patterns for our example:
- Before: "Fix Your DaVinci Resolve Exports!" (vague, no keyword anchor)
- After: "DaVinci Resolve Export Blurry? Fix These Delivery Settings" (query + promise)
Keep the primary keyword near the front when possible. Mobile truncates long titles; put the unique value in the first forty characters. Pair the title with a thumbnail that shows the Delivery page or a sharp-vs-blurry split—visual proof of the topic, not a generic face with shock expression unless that face is demonstrating the fix.
Phase 4: Description that search and viewers both use
Your description has two jobs. The first two lines appear in search and above the fold on mobile—they should restate the problem and outcome with your primary keyword once, naturally. Everything below supports watch time: chapters, links, resources, and a short summary of what makes your approach different.
Structure we use on every upload:
- Hook (125 characters): Problem + outcome + keyword.
- Chapters: Paste timestamp lines from your outline.
- Context: Two short paragraphs expanding on settings or caveats.
- Links: Related video, playlist, tool links—keep it minimal.
The Description Builder walks this structure so you do not forget chapters or front-load fluff. Mention supporting keywords once in the body—where they fit in a sentence, not in a keyword dump block at the bottom.
Phase 5: Tags—small, relevant, not spam
Tags are a minor relevance signal, not a magic lever. Aim for five to seven tags: primary keyword, one long-tail variant, topic category, tool name, and one common misspelling if it is realistic. For our example:
- davinci resolve export blurry
- davinci resolve delivery settings
- video export settings
- resolve 4k export
- davinci resolve tutorial
Do not paste fifty tags copied from a competitor. Duplicate and irrelevant tags add noise. Generate a clean starting list with the tag generator, then delete anything you would not say out loud in the video.
Phase 6: Pre-upload checklist
Five minutes before publish, run the same checks every time. This is where small channels gain consistency without hiring an editor.
| Check | Pass criteria |
|---|---|
| Title | Primary keyword present; readable on mobile; matches thumbnail promise |
| Thumbnail | Readable at phone size; high contrast; one focal point |
| Description | Strong first line; chapters match video; no broken links |
| Tags | 5–7 relevant tags; no duplicates; match spoken terms |
| First 30 seconds | Delivers on title; no long intro logo animation |
| End screen | One relevant next video; verbal CTA recorded |
Use the Pre-Upload Checklist tool so nothing slips when you are tired after editing. Check each item literally—do not rely on memory.
Phase 7: Set watch-time expectations before you publish
SEO gets the click; retention earns the next impression. Before publish, estimate how long viewers should watch for the video to feel "complete" for this topic. A six-minute settings tutorial might need three to four minutes average view duration to outperform weak competitors. A twenty-minute documentary needs a different benchmark.
The Watch Time Calculator helps you set a target from video length and goal retention. Write that target in your project notes. After forty-eight hours, compare YouTube Analytics reality to the target. If clicks are fine but average view duration is low, the problem is content or pacing—not tags.
Common workflow mistakes
Optimizing after the video is finished
If the video never mentions the keyword you put in the title, change the title to match the video—or re-record a short insert. Metadata cannot rescue off-topic content.
Same title formula on every video
"I Tried X for 30 Days" works for challenge content. It fails for troubleshooting queries. Match title format to intent, not to what went viral on someone else's channel.
Skipping competitor review
Ten minutes studying top results tells you thumbnail style, video length, and angle gaps. You are not copying—you are learning what YouTube already associates with the query.
Treating tags as the whole strategy
Tags support classification. Titles, thumbnails, and watch time drive growth. Never delay publish to hunt for "secret" tags.
One-page workflow summary
- Research: Primary keyword + intent + top-result review.
- Outline: Chapters with early payoff; vocabulary from related terms.
- Record and edit: Open with the promise from search.
- Package: Title + thumbnail as one unit; description with chapters.
- Tags: 5–7 precise tags; remove noise.
- Checklist: Pre-upload pass on all metadata and first thirty seconds.
- Measure: Watch time vs target after forty-eight hours; iterate next video.
How to document the workflow in a reusable project template
Creators skip workflows when the steps live only in their head. Create one doc—or one row in a content calendar—with fixed fields you fill before recording:
- Primary keyword: Single phrase you expect to rank for.
- Intent type: How-to, list, vs, fix, or review.
- Top three SERP notes: Length, angle, and thumbnail style of ranking videos.
- Title draft A/B: Two variants before filming.
- Chapter outline: Timestamps with keyword-natural labels.
- Tag shortlist: Five to seven tags, not a wall.
- Watch-time target: From calculator, based on length.
When you return from editing tired, the doc decides metadata—not mood. That alone cuts upload-day mistakes.
Search-led vs audience-led uploads in the same workflow
Not every video targets YouTube search. Label each project at the research stage. Search-led videos get literal titles, symptom-first hooks, and keyword-backed chapters. Audience-led videos—personal updates, experimental formats—can use story titles but should not pretend to be SEO pieces when analytics underperform.
Run the full workflow for search-led uploads only. For audience-led uploads, shorten to thumbnail clarity, honest title, and description with chapters. Trying to force keyword research onto every upload burns you out and produces awkward titles on vlogs that never needed them.
After publish: read analytics in the right order
At forty-eight hours, check traffic sources before rewriting tags. If impressions from YouTube search are low, packaging or topic fit may be wrong. If impressions are healthy but click-through rate lags, test title and thumbnail together—not one at a time across consecutive days without enough data.
If clicks and average view duration both underperform against your watch-time target, the issue is likely content pacing or a intent mismatch in the first minute—not missing tags. Change one variable on the next video; avoid panic-editing five fields on a live upload unless something is factually wrong.
Run this workflow on your next three uploads. By the third video, the steps take less time because keyword and outline habits become automatic. YouTube SEO is not one trick—it is consistent alignment from search query to final frame. Build the pipeline once; reuse it every time you publish.